KHEPRI
Installation Instructions
In order to use Khepri, three software pieces are required:
1 • The programming language, Julia.
2 • A programming environment, Visual Studio Code,
along with the proper extensions for Julia.
3 • The algorithmic design tool, Khepri.
This page contains the instructions for the required installations, as
well as:
4 • Beginner tips on how to use Visual Studio Code.
5 • Instruction on how to install and use Khepri Traceability.
1.
Julia programming language
First, install Julia: https://julialang.org/downloads/
We recommend that you accept the default installation options.
2.
Programming Environment
Second, install Visual Studio Code: https://code.visualstudio.com/
More specifically, use: https://code.visualstudio.com/Download#
Again, we recommend that you accept the default installation options.
Installing the Julia Extension
Third, launch Visual Studio Code and install the Julia extension.
In Visual Studio Code click the View menu in the top
bar, and choose Extensions (Ctrl+Shift+X).
In the extensions pane, type Julia into the search engine (on top)
and select the Julia extension by clicking the install button.
Visual Studio Code will install it. When the installation completes,
restart Visual Studio Code.
Launching the Terminal and the Julia REPL
To run code, or to visualize the results of any program,
launch the Terminal (or REPL) by going to
the View menu in the top bar and choosing Terminal
(Ctrl+ç in a PT keyboard; Ctrl+` in a US keyboard).
The terminal, which should now be visible at the bottom
of the screen, should also indicate that Julia is running. In
the event a Julia prompt is not visible in the terminal
(julia>), change the dropdown menu on the top right
corner of the terminal to the Julia REPL option.
Another option to start the Julia REPL is available directly through
the Command Pallete. Go to the View menu in the top bar and choose
Command Pallete (Ctrl+Shift+P). Type Julia: Start REPL in the search
engine that appears and select the corresponding option. The
terminal should appear at the bottom of your workspace. The same can
be achieved with the following key bindings: Alt+J Alt+O.
3.
Khepri algorithmic design tool: Released version
In this section we show you how to install the released version of the Khepri AD tool. Khepri v1.1.0 is a stable and documented version of the tool from 2022. However, it does not accommodate the developments the research team has been working on since then.
With the cursor in the REPL press Enter. Julia should have
started and will begin its own installation process. When finished,
press the ] key. The Julia prompt (julia>) should change to
a package installation prompt (pkg>). In front of it, type
add Khepri and press Enter.
After the installation is done, press backspace
(←) to return to the Julia prompt (julia>).
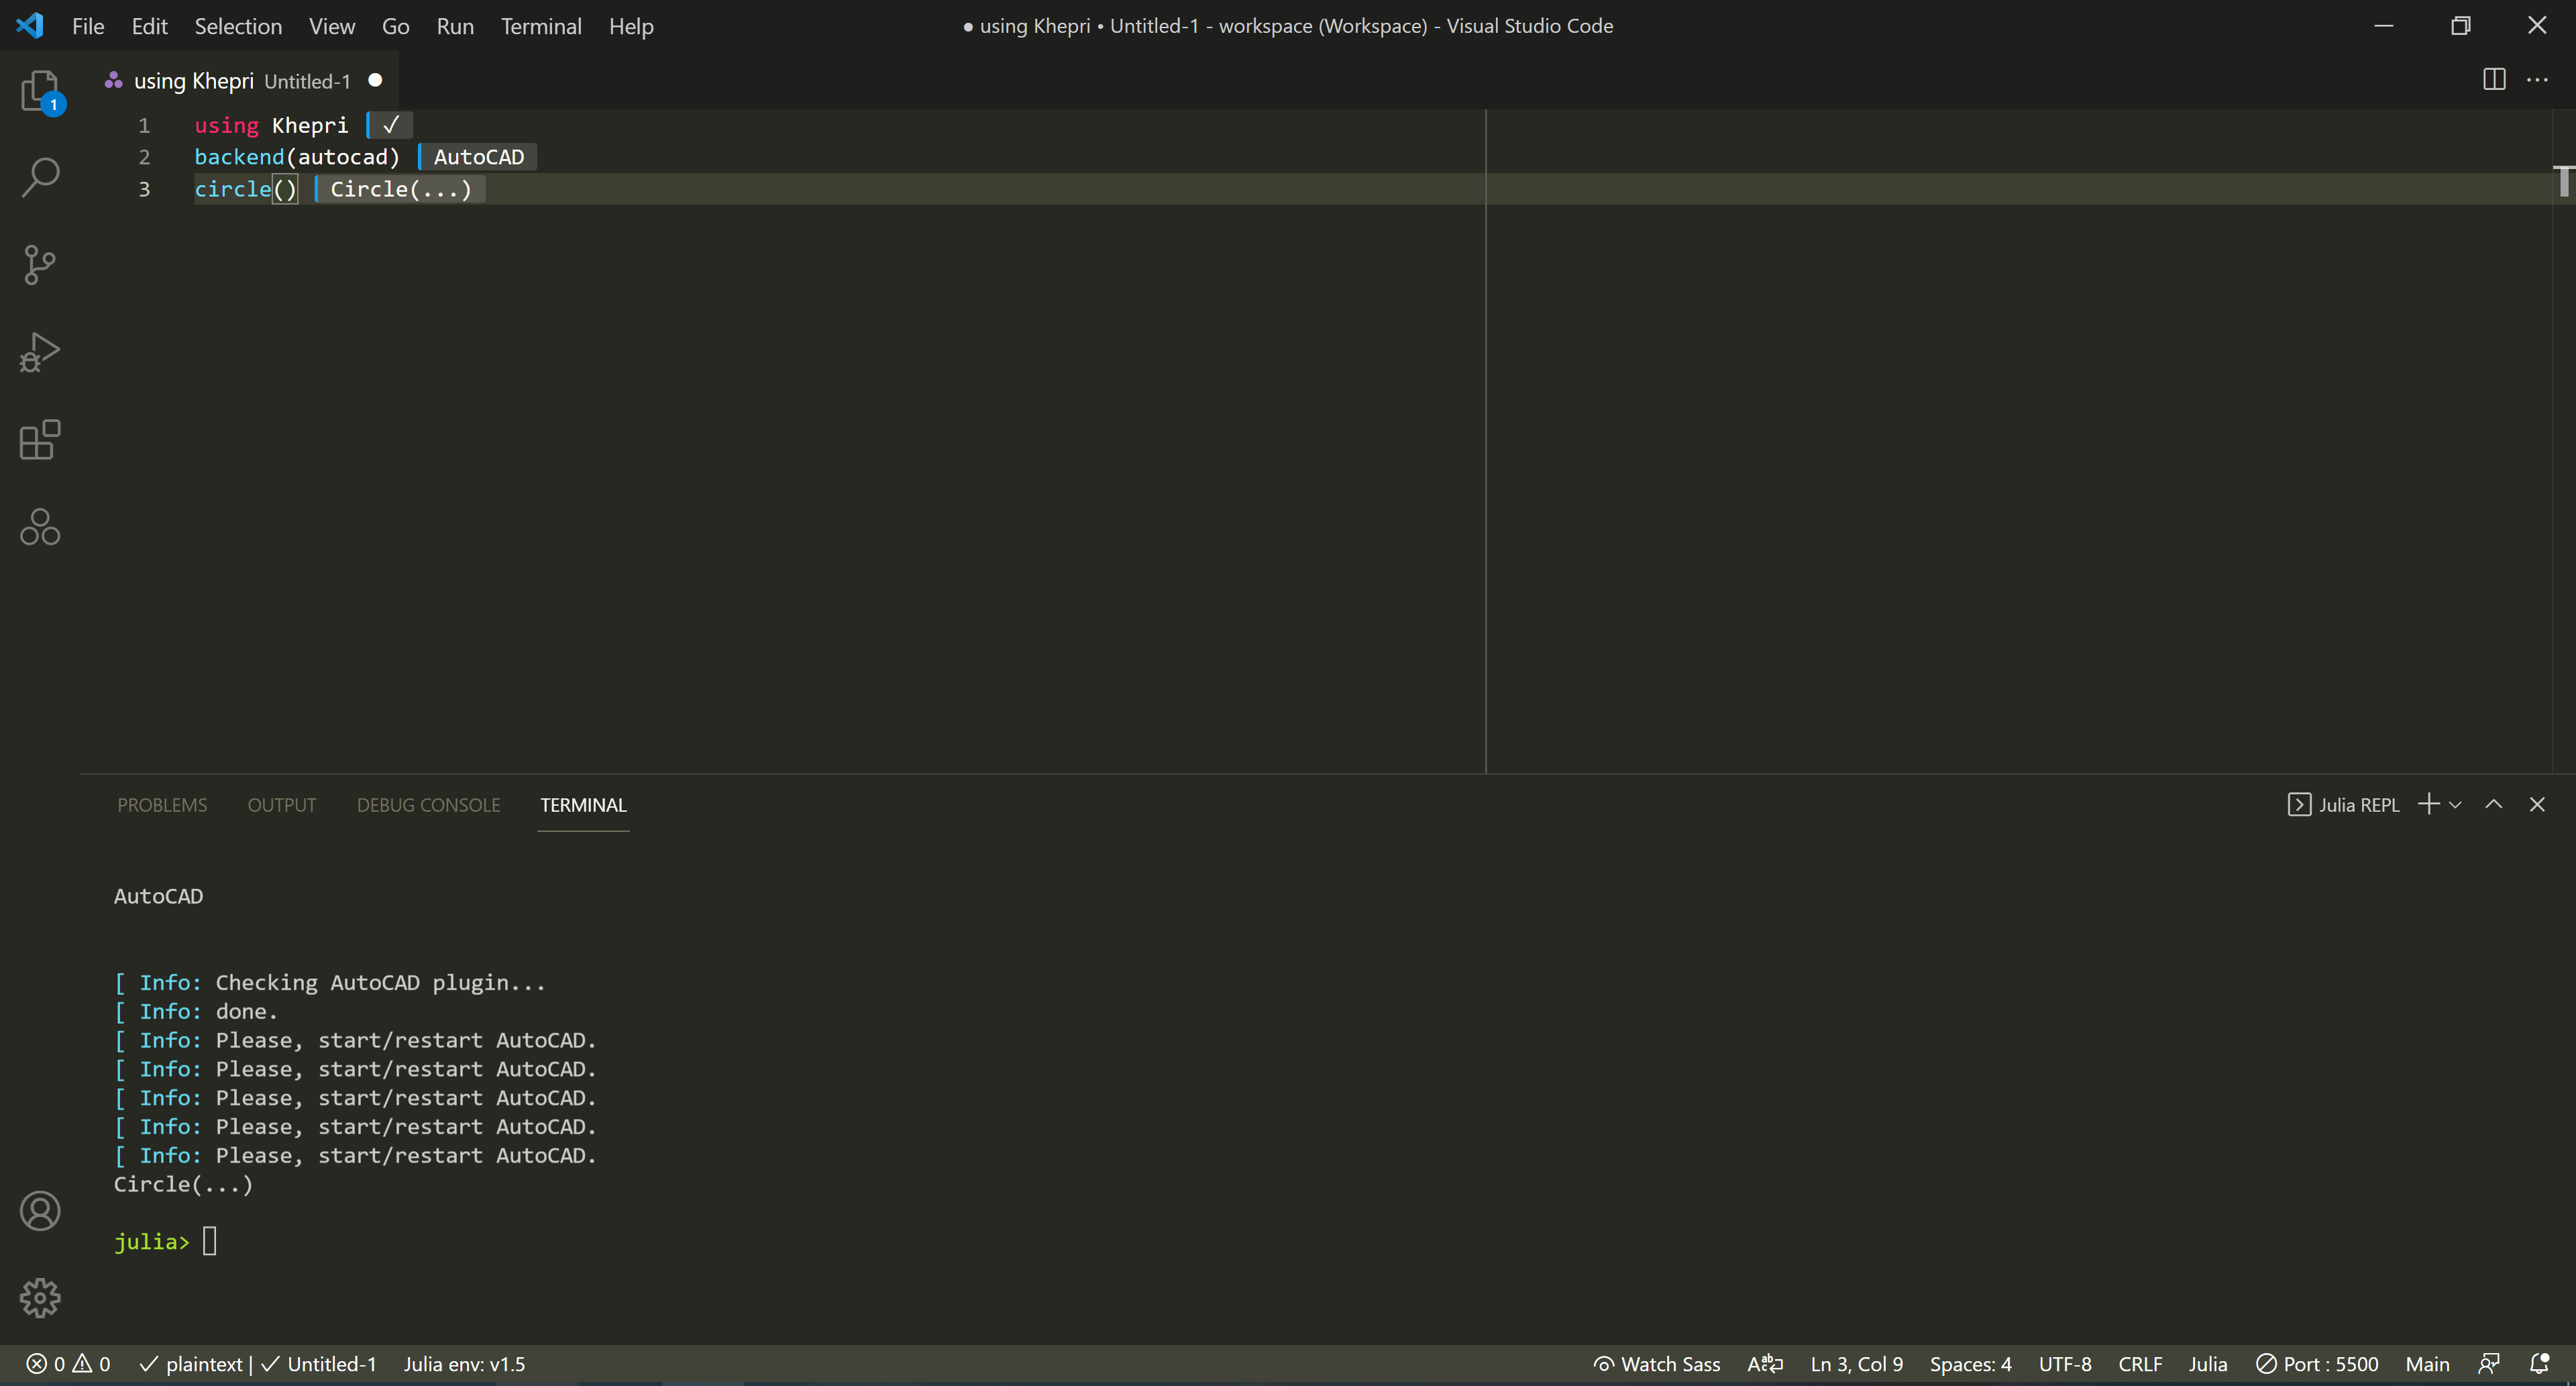
To test if the installation worked, start by connecting to the AutoCAD backend. Write and evaluate the following lines of code in the REPL by clicking Enter after each instruction:
    using Khepri
    backend(autocad)
    circle()
Then start AutoCAD and open a new drawing. If a dialog box appears
in AutoCAD asking if you want to load Khepri, click on the button
Always Load. A circle should then appear in AutoCAD.
Note: in case the REPL shows errors and messages such as 'Please,
close AutoCAD and retry' or 'Please, start/restart
AutoCAD'... just do what it says.
⚠ Troubleshooting
If, during the Khepri package installation, the following
error appears: ERROR: SystemError: opening file "C:\\Users\\<user
name>\\.julia\\registries\\General\\Registry.toml" : No such file or
directory., it means the package installer is trying to find the
Registry.toml file, which should be in the path provided and is
not.
Close the editor, and delete the
.julia folder from the suggested path (C:\Users\<user name>\.julia). Then,
open the editor, launch the Julia REPL, and repeat Khepri's inhalation process.
If this does not work, repeat the process once more, this time also uninstalling
Julia from your computer entirely. Reinstall it again and try anew.
3.
Khepri algorithmic design tool: Main version
In this section we show you how to install the most recent version of the Khepri AD tool. Khepri main/master is a branch under development. It benefits from the most recent updates our team has been working on. Occasional inconsistencies are expected tough. It is also divided in modules so that users may install only the ones they are interested in exploring. The Base module should always be installed, as it provides support to all others. We will exemplify the installation process with the AutoCAD module.
Press the ] key in the Julia REPL. The Julia prompt (julia>) should
change to a package installation prompt (pkg>). In front of it, type
add https://github.com/aptmcl/KhepriBase.jl and press Enter.
When this installation is done, repeat the process for add
https://github.com/aptmcl/KhepriAutoCAD.jl. After the latter installation is
done, you may press backspace
(←) to return to the Julia prompt (julia>).
To test if the installation worked, write and evaluate the following lines of code in the REPL by clicking Enter after each instruction:
    using KhepriAutoCAD
    circle()
AutoCAD should start automatically. Please select the KhepriTemplate tab in AutoCAD as
suggested in the REPL. If a dialog box appears in AutoCAD asking if you want to load
Khepri, click on the
Always Load button. A circle should then appear in AutoCAD.
Note: in case the REPL shows errors and messages such as 'Please,
close AutoCAD and retry' or 'Please, start/restart
AutoCAD'... just do what it says.
Khepri Application Modules
Khepri Backend Modules
4.
Beginner tips for the programming environment
Opening a Julia file
As mentioned, it is possible to write and run programs directly in the Julia
REPL. However, these instructions cannot be saved for later use. Instead, the
REPL is useful for testing parts of the program and for visualizing the results.
For more complex developments, programs should be developed on a Julia file that can be saved
to the computer.
To begin programming, open a new text file by going to the File menu in the top
bar and choose New File (Ctrl+N). This will open a new text file. There
are two options to convert it into a Julia file:
• On the bottom right corner of the workspace, notice that the
file is cataloged as Plain Text in the Select Language Mode button. Click on
it to change the file type. A search engine will appear, where you should
write and select Julia. The file should now be recognized as a Julia file.
• The same effect can be achieved by saving the new text file with the
Julia extension. Select the File menu in the top bar and choose Save As
(Ctrl+Shift+S). In the Save as type dropdown menu select the Julia (*.jl)
option, or simply add the extension to the file name (e.g.,
Untitled.jl).
Running Code
There are several options to run the code in your program. You may run the full program, or you
may prefer to run only parts of it. In either case, the results of each run will show in the Julia
REPL.
To run the full program click Alt+Enter when your cursor is anywhere
within the program file.
To run only parts of the file, you can use:
• Ctrl+Enter or Alt+J Alt+K, which sends the current line (where your cursor is) or selection to the REPL.
• Shift+Enter, which runs the current instruction and moves your cursor downwards simultaneously.
Other useful commands include:
• Ctrl+D or Alt+J Alt+K to exit the Julia REPL
• Ctrl+C to interrupt or cancel a process. Useful to break infinite loops or erroneous runs.
• Ctrl+L to clear the terminal screen.
Inline visualization of results
We have shown you how to visualize program results in the REPL. There are other options for the visualization of results, namely inline visualization, which allows you to see the results of your program directly in the program file, in front of the line you just ran. Go to the File menu in the top bar, choose Preferences, and then Settings (Ctrl+,). Here, open the Extensions drop-down menu and find Julia. In the Julia extension settings menu, change the default options in Execution: Result Type to inline or to both.
⚠ Troubleshooting
When the Julia REPL fails to start and an error message with either of the following texts
appears: The terminal process failed to launch: Path to shell executable is not a file of a
symlink or Path to shell executable does not exist.
If this is the case, Visual Studio Code could not find the Julia.exe file to
launch the Julia shell in the editor. You must provide the path by hand.
Go to the File menu in the top bar, chose Preferences, and then
Settings (Ctrl+,). Here open the Extensions drop-down menu and find Julia.
In the Julia extension settings menu, find the Julia: Executable Path
option. You will paste the correct path to the text box below. But first, find the file on your computer:
A • The Julia.exe should be located deep in the AppData hidden
folder. This folder can be found at C:\\Users\\<user
name> if you check the Hiden items option on the
View > Show/Hide tab. Alternatively, type %APPDATA% on Windows'
File Explorer search engine and step back one folder. When in the AppData
folder, open the following folders in sequence: AppData > Local > Programs >
Julia > Julia-*.*.* > bin (where *.*.* represents the Julia version you
installed).
Then copy this file path, all the way to the Julia.exe file,
paste it on Visual Studio Code, and add a second set of \ to each folder level.
The final link should look something like C:\\Users\\<user
name>\\AppData\\Local\\Programs\\Julia\\Julia-*.*.*\\bin\\julia.exe
B • In case no Julia file exists on the AppData folder, find Julia's
shortcut either on your Desktop or Start Menu. Right-click on
the icon and choose the option Open File Location. This will most
likely lead you to another shortcut, so repeat the process until you reach
the
Julia.exe file. At this stage, follow the remaining steps in option A.
C • If none of the above work, run the following command on the REPL to acquire the bin file path
on your computer: println(Sys.BINDIR). Then follow the remaining steps in option A.
5.
Khepri Traceability
Traceability is an excellent aid for program comprehension as it allows users to identify which lines of code are responsible for which objects in the model, and vise-versa. Traceability in Khepri is only available for users of the main/master version (not the released one).
Installing Traceability
1 • Download the following file: vsix file
2 • Ctrl+Shift+P > Find and select the Extensions: Install from VSIX option
3 • Choose the downloaded file and click Install
4 • If the editor asks for a reload, just do what it says
Using Traceability
[Tip] • Divide your screen in two: VS Code on one side and AutoCAD on the other
1 • Add the following line to your program: traceability(true)
2 • Run the program as usual so as to generate geometry in AutoCAD
3 • Save any changes made to the code files you wish to trace
4 • Program → model traceability
▷ Click Shift+Alt+T to start
▷ Click any line of code in the program and the corresponding geometry will be highlighted in the model
▷ Repeat any number of times. Traceability will remain active until told otherwise
▷ Click Shift+Alt+T once more to exit
5 • Model → program traceability
▷ Click Shift+Alt+S. AutoCAD will be waiting for you to select a shape in the model
▷ Click any object in the model and the corresponding call chain (the sequence of instructions
responsible for generating that object) will be highlighted in the program
▷ Repeat any number of times by clicking Shift+Alt+S (each time) to prompt the object
selection mode

